Wednesday, July 31, 2013

Are your ears BUZZING?

Cicada July 31, 2013 Las Vegas, Nevada
Lately have you been hearing buzzing and clicking?  To the point it might drive you crazy?  Or is it music to your ears?  A sign summer is in full swing.

Cicadas buzz and click.  So many so, in fact, there seems to be a constant hum this time of year.

When young Cicadas hatch from their eggs as nymphs, they dig themselves into the ground to live off the juices of plant roots.  They spend their early stages in the ground before surfacing as adults.  There are varying lengths of this cycle but most take years.

There are several thousand species of Cicada worldwide.  The male has the loud noise makers.  Maybe not surprisingly each species has it's own distinct "song".  They can produce sound up to 120db.  This is among the loudest of all insect produced sounds.

OCTO-PIE or OCTOPUS PIE? What do you say?


Blueberry OCTO-PIE or OCTOPUS PIE

I wish I could take credit for this idea, or even the name someone pegged this with.  Both were found floating around on Facebook.  The one I happened to see only had a photo and no recipe.  So I set off to try and produce the pie.  I also wanted my own photo of the trophy…dish… in this case.  Blueberries were used to create the desired contrast for the photo.  Any fruit pie would work.

The one I saw, I assume had used blueberries for the eyes.  I happened to have a partial left over jar of Maraschino Cherries.  The remainder of a jar left over from baking a Pineapple upside down cake in a Dutch Oven.   The recipe I provide here was done in a Dutch Oven as well.  

This pie was baked in a glass 9 inch pie dish, raised up off the bottom of a 12 inch, deep style, Cast Iron Dutch oven, via an inverted second pie tin.   Several layers of aluminum foil were put in on top of the pie tin prior to placing the glass pie plate containing the raw pie.  The foil left long enough to go up the sides.  The foil  can be folded over in case the top starts browning too fast, but is mostly to assist in lifting out the pie once baking is complete.  Enough coals to create 400° heat.  In our case, 9 coals on the bottom, and 19 on the top lid.  All coals arranged at the far perimeter of the bottom, and the lid.

Ingredients
2   Pie Crusts (prepared for at least a 9 inch pie)
2   21oz Cans Blueberry Pie Filling (Or 4 cups of homemade prepared filling)
1   Small jar Maraschino Cherries (Could also use fresh uncooked Blueberries
6 oz of Fresh Blueberries (washed and stems removed)
1   egg white
¼   cup milk

Mix egg white and milk together (set aside)

Pre-heat Dutch Oven or Kitchen Oven to 400°

Brush both sides of one uncooked pie crust with the egg mixture.  Lightly grease Pie plate.  Place the one Pie crust in the pie plate, up the sides, and trim off excess.  (Save all trimmed pieces)

Spread the Pie filling evenly over the bottom crust.  Next spread the fresh blueberries over the filling (remember to save back 2 for the eyes, and about 10 for the brains :-( .  If you are using Cherries for the eyes and brains, spread all the fresh blueberries on the filling.
Brush both sides of the second uncooked pie crust and lay out on cutting board.  Cut an upper main body with short tentacles.  Cut a 2nd main body without tentacles.  Using these dough 2 parts, sandwich cherries (or some of the fresh blueberries) to in effect become brains, as well as creating fill to form a raised 3D head.   Seal the bottom dough to the top dough around the edge using the egg white solution.  The tentacle half, is the top.  Save back 2 cherries or 2 fresh blueberries to create the eyes.  With a circle of dough larger than the cherry/blueberry fold the dough over the berry and lightly pinch to create an eye.   Use egg wash to attach these eyes to the head.   Keep this whole head/eye unit on the cutting board.

Using other dough scraps, cut long tentacles, and snip along one long side (Or use pinking shears).  Arrange these with a twist to make interesting looking Octopus tentacles that start somewhere in the, to be, head area.  Extend them down to the very edge of the pie surface.  Once those legs are in place use a spatula to gently lift head unit off the cutting board and into position on the pie.  The head should cover the upper ends of the in place tentacles.

Bake at 400° for 30 minutes and then check the browning.  Cover with foil if excessive browning of the upper crust is occurring.  Then bake another 10 minutes for a total bake time of 40 minutes, or until crust is golden brown.

Serve warm with vanilla ice cream.  Oh yeah!!

Monday, July 29, 2013

UFO seen in Las Vegas? First Friday!

What does Las Vegas, and seeing a UFO have in common?  FIRST FRIDAY Las Vegas, Nevada 


If you are a "local" or visiting Las Vegas on any "First Friday" of any month.  Be sure to find your way to the Downtown Art District.  The fun filled community event starts gearing up in the evening around 5:30PM.  Open and free to the public.

Come early for easy parking. You can also take the shuttle or a cab.  Even a UFO if you can get one to pull over.  The general location is the cross streets of Charleston and Casino Center, or Charleston and Main St.  First Friday shuttle service runs from 4:30pm until 11:30pm.  There is free parking as well as parking lots charging a $5 fee.

UFO's really do exist!
A great place for the public, Artists, Vendors, Entertainers, and local businesses to mingle in a Street Fair environment.  Many local Art and Retail business stay open late for your browsing and shopping enjoyment.   The official website to register as a Artist, Vendor, Sponsor, or Entertainer is:
Contact: 702-384-0092 (Public Info Line)
Email: info@firstfriday-lasvegas.org 

The event continues to grow and evolve.  As many as 30,000 people move into this section of town to enjoy the activities.  You can find street art, to fine art.  Several long time food & drink establishments, to retro shops and antique shops.  What fun it is to browse through all the shops.   

We have attended at various times of year.  There has been a mini "Burning Man" performance, to vintage and antique cars lined up for viewing.  Street vendors selling popcorn, to fine wine.

We understand this First Friday (August 2013) there will be 2 giant side by side aquariums erected by the team from the TV show "Tanked"

So if you are interested in buying a deep fried twinkie, or a unique piece of art, be sure to come downtown and meander through the event.  Bring your camera.  People watching is free....and there will be no shortage of that!  We hope you catch a glimpse of the elusive UFO the hoovers around at times.  Have your camera ready, because it may be there, then gone!


RECIPE: BASIC DUMP CAKE (Dutch Oven Cooking)

Submitted by: Rick Beach

BASIC DUMP CAKE (Dutch Oven Cooking)


1 CAN       Canned Fruit Filling (Or can of fruit pre mix fruit and syrup with a tablespoon of Corn Starch
(Optional Cinnamon and Brown Sugar)
1 Box        Yellow Cake Mix (Super Moist type or Pudding in type)  (Variation Spice or Carrot)
1/4 Stick   Butter
1/2 Can    7up or Lemon Lime Soda


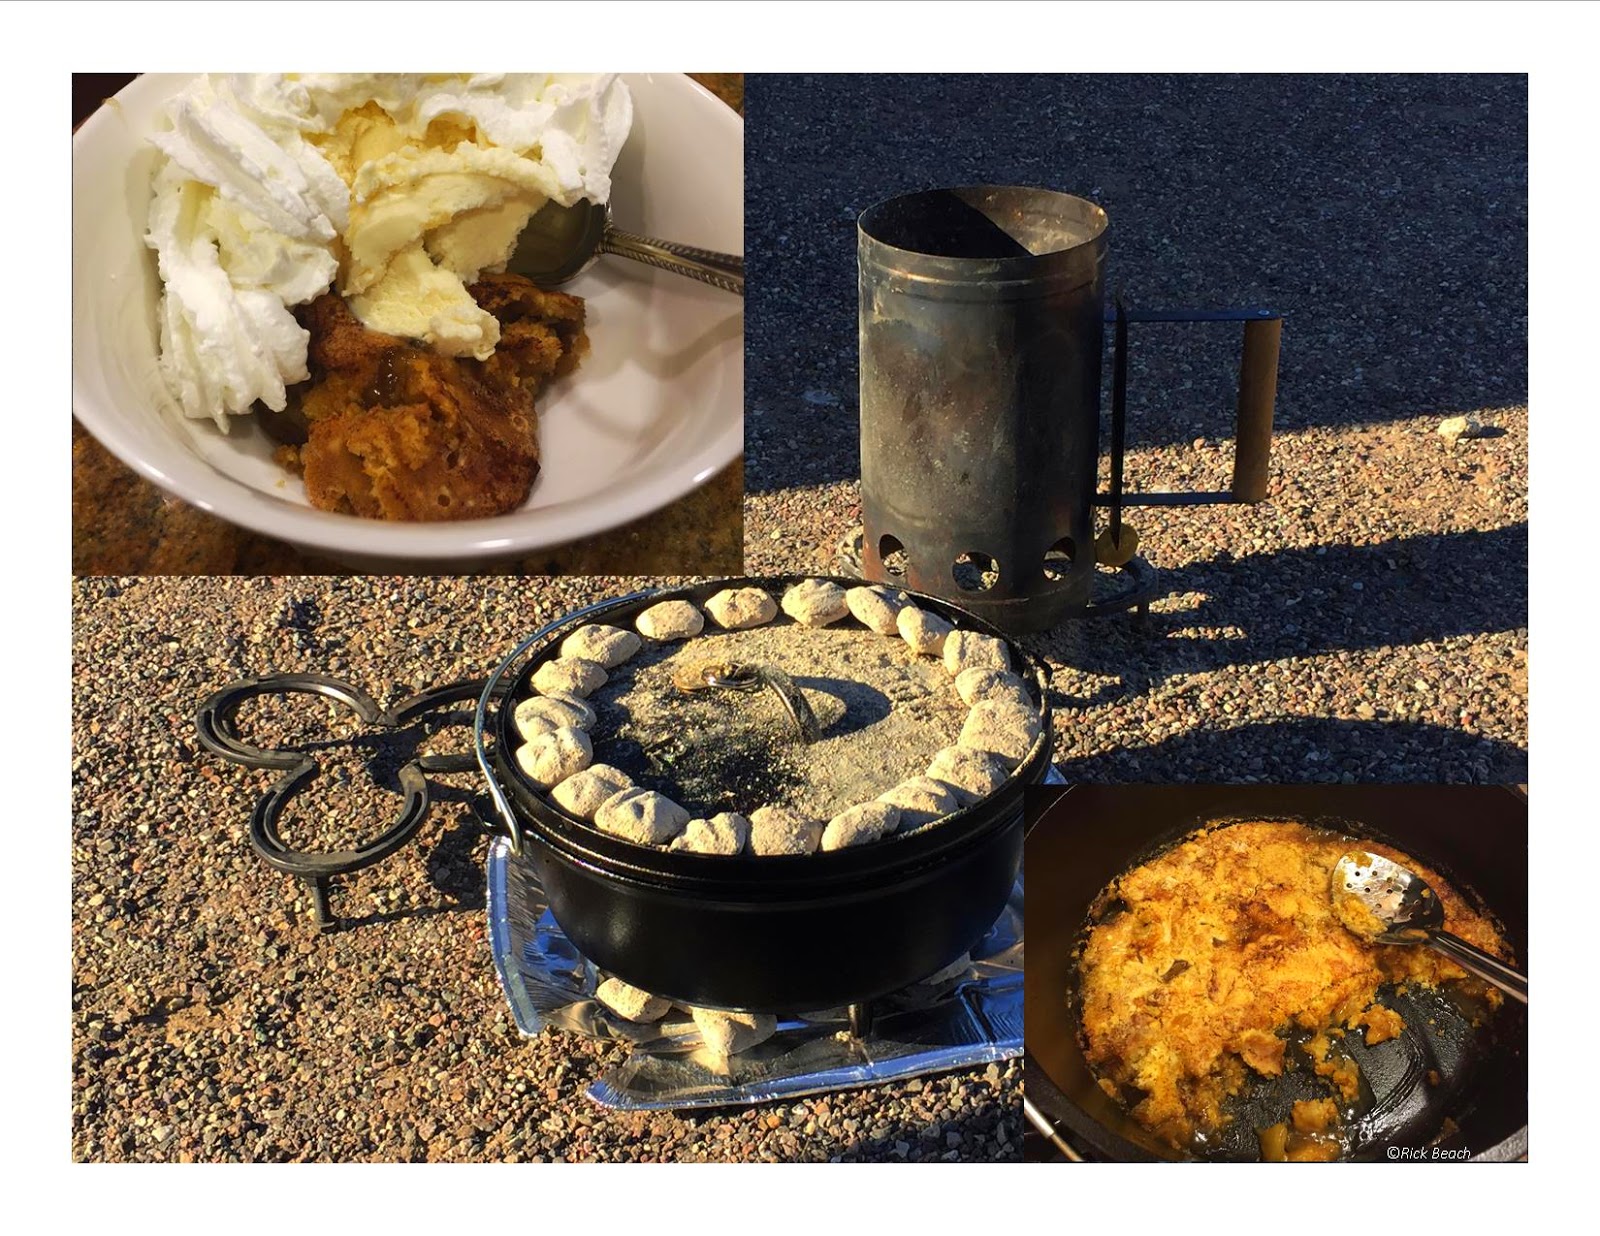
10 Inch Dutch Oven Foil lined (Light coat of Crisco or Spray oil such a Pam)
Enough coals for 350° heat  (7 Coals Bottom. 13 Coals Top of using 10 inch DO)
or
12 Inch Dutch Oven Foil lined (Light coat of Crisco or Spray oil such a Pam)
Enough coals for 350° heat  (9 Coals Bottom. 15 Coals Top of using 12 inch DO)


*Dump Fruit Filling or Fruit/Cornstarch mix into Dutch Oven (You can add Cinnamon & Brown sugar if desired)
*Sprinkle Dry Cake Mix evenly over fruit
*Drizzle 7up (Approximately 1/2 Can) over the cake mix  (Enough to moisten the cake mix a little)
*Cut the butter in thin pats, then drop evenly over the top of the cake mix

Bake at 350° for about 45 minutes or until golden brown on top and a toothpick or knife, when inserted, comes out clean.

DUTCH OVEN COOKING-How Many Coals should I use?


How many coals do I use when Dutch Oven Cooking? 

 The science of the heat


Are you looking for a method to estimate the amount of hot coals when Dutch Oven Cooking?  Here are some things to know and a couple common methods.  Someone told me not too long ago they had an app on their phone with a charcoal calculator.  But since we are cooking the old fashion way, lets use our old fashion brain to remember how to get our heat right.  I personally use the 3 Uppy-down rule.  Easily to remember and nothing to carry.  The same rule applies to all diameters of Dutch Ovens.

If you can successfully bake a recipe in your kitchen oven, there is no reason you cannot produce similar results using a Dutch Oven, and hot coals.

There is some science to using coals.  You have to be aware of some of the issues to get consistent heat.

Consistent heat can be generated from modern Charcoal.  Whether you cook in competition (which I do) or just want to master your skills preparing family meals.  Be aware temperatures and cooking time can even vary between brands.  My "go to" preferred brand is Kingsford.  Campfire coals are a different animal and I am not discussing them.  Other than to touch on the fact they are a usable source of heat if you care to master another technique.

Some cooks prefer campfire generated wood coals.  Campfire type coals will generate different heat, and cook duration times, depending on the species and dryness of the wood used.   The best of cooks have used the good old "trial and error method" to hone their skill.  This is what makes Dutch Oven cooking so much fun.

My suggestion for new Cast Iron Cooks, is to select your choice/brand of charcoal briquettes.  Then stick with your selection until you are cooking with consistent results similar to what you obtain using your kitchen gas or electric oven.  Once you get the hang of it, start experimenting with other brands, or campfire coals and various species of wood.

There are other methods and techniques not covered in this article.  Many have their own special way of getting the heat right.  There are many seasoned cooks out there cooking over fire....and just as many methods of doing it.  So we will list a couple to get you started in this great past time of Dutch Oven cooking.  Search for more, or join a cooking group to see how its done...then use your favorite method.

If you are new to DO cooking, or haven’t yet gotten consistent baking results, we recommend sticking with one source of fuel until you understand your heat and your recipe(s).  As we mentioned, we have had the best results with Kingsford brand charcoal.  It normally is ready to go 15 minutes after starting, and generally gives you about 45-60 minutes worth of cook time.  A great choice to start with before you venture on to other experimentation.  I personally still use this brand at home and during competition cook-offs.  Plus it is often the provided brand at cook-offs where charcoal is supplied.  This is not a paid endorsement, but a personal preference and recommendation.

Other factors such as wind, altitude, and surrounding air temperature, affect your heat and cook time.  In this article we are only going to provide a couple general “rule of thumb” methods to obtain your heat.  This is under no wind (or using a wind screen to block the wind), and during comfortable air temperature such as spring, summer, and fall. 

Now to some of the science.

In all coal counting, or coal placement methods, the first rule to remember is  more hot coals must be on top and less hot coals must be on the bottom.  Heat naturally rises, so more of the bottom heat transfers and is absorbed into the bottom of the DO.  The heat needed on the top must radiate down, which requires more coals to produce the same top temperature within the oven.  It is not natural for heat to go down.  Since it is natural for the top coals heat to just rise, more of the top heat is lost.  So remember,  More coals on top and less on the bottom!

One of the most common errors of a new Dutch Oven cook is to place too many coals underneath the DO.  The result is food burned onto the bottom.  It is the quickest way to wreak an otherwise perfect recipe.

The second rule to remember in all methods is, the coals need arranged toward the outer perimeter of both the bottom, as well as the lid to avoid burning.

Thirdly rotate your DO, and DO lid, at various times during the cooking process.  This simple technique helps prevent hot spots forming and burning food.  Every 15 minutes rotate the lid and bottom 90° in opposite directions. 

Cakes are tricky since they might "fall" if the pot is bumped too hard.  Dump cakes and cobblers are usually pretty 'wet' and normally will not need rotated, thus preventing falling.  Rotate very carefully if you do start rotating cakes.  It is best to bake with other techniques to avoid rotating cakes.  There are other advanced techniques such as raising pans inside a DO, using an internal trivet.  But that is a whole different subject.


3 UPPY DOWN Heat Rule Method

The simplest rule and easiest to remember.  That we have heard of.  Uses the “3 Uppy Down Rule”.  This is our preferred method. Once you use it a few times, and get it in your head, you won’t have to carry any type of chart.  In general it produces 350° in any Diameter size Dutch Oven.  As the title of the rule implies, and knowing you need more heat on top than on the bottom, you have the 3 to remember for any pot.  The only other factor is, knowing the Diameter of your pot.  If you have a normal depth 12 inch DO, you simply add 3 to the diameter for the top (12+3=15 coals).  You then minus 3 from the diameter for the bottom (12-3=9 Coals).

So for another example, if you have a 10 inch DO and needing 350°.  TOP coals (10+3=13).  Bottom coals (10-3=7)

 Rule of thumb for additional heat is; each additional coal added to the top only, will increase the internal temperature an additional 10 to 20 degrees.  Round that off to 15 for rule of thumb.
      
                                         350° Heat
Size Dutch Oven               Top Coals             Bottom Coals
9 inch                                      9+3=12                 9-3=6
10 inch                                  10+3=13               10-3=7
12 inch                                  12+3=15               12-3=9
14 inch                                  14+3=17               14-3=11
16 inch                                  16+3=19               16-3=13

*This is method produces 350° heat.  Each Additional coal on top raises the internal temperature 10 to 20°
*Deep Dutch Ovens may need an additional coal or 2 on top to get to the 350° mark (add it to the top)
*Wind, air temperature, and altitude may affect temperature and cook times
*Recipes that need to cook/bake more than an hour need a new batch of coals started at the 45 minute cook mark, then added after the first 55 to 60 minutes of cooking has ended.  Re-apply as needed.


Below is a second method.  Preferred by many,  More complicated than we like.  But if you try this one and like it, print or re-create this chart.  Then carry it with your recipes or Dutch Oven Cookbook.

Ring Method Heat Chart Method

Sunday, July 28, 2013

RECIPE: CALIFORNIA ROLLS

CALIFORNIA ROLLS (with Spicy Crunch Topping)


Recipe & Photo by: Rick Beach

We enjoy making these homemade.  There are many variations.  Here is one of ours.   The sauce is sweet and medium spicy.   You can adjust the sweetness and spicy hotness of the sauce to your taste.

Start by cooking 2 cups of uncooked rice, with 2 1/4 cup of water.  This yields about 4 cups of cooked rice.  We prefer Nishiki Rice, or a Jasmine.  We also prefer a rice cooker to cook the rice in a consistent manner.  In this recipe cook the rice and continue preparing while still hot.  Rice should be done, not mushy, but slightly sticky.  Do not rinse.  If there is any water left, drain and discard the water.  Once you know your rice cooker you can make perfect rice that has no leftover water to drain....this is the best to use.

Sushi Rice
4 Cups of prepared cooked rice (Drained of all water, slightly sticky, and still hot)
1/3/Cup Rice Vinegar (Unsweetened)
3 Tbls    Sugar
1/12 tsp Salt

In a non metallic bowl, whisk together the Rice Vinegar, Sugar and Salt until the sugar and salt are completely dissolved.  Pour in the hot cooked rice.  Fold over until the rice is completely coated with the vinegar mixture.  Set aside/chill until at least room temperature.

Sushi Spicy Brown Sauce
Prepare while waiting for Sushi rice to cool
1/2 Cup Kikkoman Ponzu Suace
1/2 Cup Kikkoman Teriyaki Baste & Glaze
1 Tbls    Sugar (or 2 Tbls of Agave Sweetener) (Adjust sweetness to taste)
1 Tbls    Sriracha Chili Sauce  (Adjust spicy-hot to taste)
1 tsp      Corn Starch

Note: Adjust Sweetness & Chili sauce to your taste.  1 Tbls of the Chili Sauce is pretty spicy hot.


Whisk ingredients together.  In heavy sauce pan simmer on medium and whisk continuously for about 10 minutes until reduced and slightly thickened.

Chill

California Rolls
4 to 6    Sheets Sushi Nori Toasted Seaweed
2           Carrots cut lengthwise in quarters
2 Stalks Celery cut lengthwise in 1/2 in strips (OR strips of peeled Avocado's)
12 oz     Cooked Crab meat strips or Cooked Imitation Crab strips
4 Cups  Prepared Sushi Rice (Above)

Sushi Spicy Brown Sauce (Above)
Small Can of French Fried Onions (crushed) or Crushed Corn Flakes for the crunch topping 


Making the Rolls

On a piece of wax paper lay one sheet of the toasted seaweed Glossy side down  (When eating. the glossy surface goes to the tongue.

With wet hands spread a thin layer of prepared sushi rice over the rough side of the seaweed sheet.

Lay a row of crab, row of carrot, and row of celery or avocado (Long way across the sheet)

Tightly, but careful not to rip, roll the seaweed sheet, rice, etc

Roll the wax paper round the outside.

Chill.

To Store: Wrap plastic wrap around the wax papered rolls.  Twist the plastic wrap on both ends and tuck under.  Place on a plate or tray and refrigerate.  They taste best eaten when fresh.  Don't store more than 48 hours.

To serve

Remove plastic wrap but leave the roll wrapped in the wax paper.  Wet sharp knife with cold water and leave wet.  Slice cross ways through the Sushi roll log at desired widths.  Keep knife wet as you continue to slice off  more servings. Remove the wax paper from the cut pieces before serving.  Top with crushed french fried onions and drizzle with Spicy Brown Sauce.  Serve.

Makes (4 to 6)  8 inch rolls prior to slicing.


Saturday, July 27, 2013

"ARE WE FLOAT'n YET"? River Regatta - Bullhead City, Arizona August 8-10, 2013

Bullhead City, AZ River Regatta

August 8th thru 10th, 2013


"ARE WE FLOATING YET"?    


This is one crazy annual party on the river, and around the Bullhead City, AZ and Laughlin, NV area.  If you love the water don't miss this "floating on the river" event.

Check the link to the event for latest details.  Attendance to the event grows each year.  People from many States flock to the area in the mid summer heat just to be in this event.  They bring any type of floating device imaginable.  There are water floats, things that float, and people that float.

Send us some of your photos of this event, and a short story, or funny thing that happened.  We will share it on this blog and credit you with the material.  See our right side info bar on how to contact us!

Wear your safety gear and sunscreen.  Stay safe and enjoy the fun!


RECIPE: Blueberry Cobbler Gluten Free

Recipe Submitted by Kathleen LeBlanc  Las Vegas, Nevada
Here I go again with kitchen experiments....I took a basic blueberry cobbler recipe  and added my twist. Sorry no photo because it was done in the oven and needed to taste the conversion first.  So here is the recipe:

Gluten –free Blueberry Cobbler                for 10 inch Dutch Oven
¾ stick of butter                                               ½ teaspoon salt
½ cup coconut flour                                        1 cup coconut milk
½ cup gluten free baking mix                      2 cups fresh blueberries
2 teaspoons baking powder                        1 -3/4 cup sugar
Melt butter in 10 inch Dutch Oven.  Mix together the flours, baking powder, salt, 1 cup sugar and milk.   Pour this mixture on top of the melted butter.  Wash berries and mix with the remaining ¾ cup sugar.  Pour on top of the mixture.
 10 inch Dutch Oven, if baking in DO direct (7 Coals Bottom -13 Coals Top), about 45 minutes.
Note:  A variety of fruits may be substituted for the blueberries:  fresh pears, apples or peaches. 
To convert to sugar-free :   substitute  ½ cup  Splenda,  4 tablespoons  agave nectar, 4 tablespoons  maltitol syrup or sugar free maple syrup for 1 cup of sugar.

Kathleen

TOPONAUTIC.blogspot needs a photo of this recipe.  Send us yours to be posted in this blog, credited to you the photographer.

Friday, July 26, 2013

RECIPE: Bundt Cake Meatloaf Stuffed with Garlic Mashed Potatoes

         BUNDT CAKE MEATLOAF STUFFED WITH GARLIC MASHED POTATOES
Recipe and Photo by: Rick Beach
MEATLOAF
1 1/2lb    Ground Beef (Lean or Sirloin)
2            Garlic cloves minced
1            Onion (Medium size Sweet) Diced
3/4         Cup Celery Diced
1            Cup Ketchup
1            Cup Diced Bread
1/4         Cup Milk
1/2         Tsp Mustard (French's Yellow hot dog type)
1            Tblsp Worcestershire Sauce
1            Tblsp Liquid Smoke
2            Tblsp Dried Cilantro Flakes
1/4         Tsp  Ground Black Pepper
1            Tsp  Salt
2            Eggs

Meatloaf Topping
1/2        Cup Ketchup

Mashed Potatoes
3           Large Russet Potatoes (Peeled and cut in large chunks
3           Cloves Garlic
1/2        Stick Butter
1/2        Cup Buttermilk
1           Tsp Salt
Bacon Crumbs and chopped Chives

Preheat Oven to 350

MEATLOAF
Saute Garlic, Onions, and Celery in a small amount of oil or butter.

In mixing bowl combine all ingredients and mix together by hand.

Divide meat mixture into 6 equal parts.  Press into a greased (6) mini Bundt Pan. (I used half of a (12)

Bake for 45 minutes.  Turn out upside down on a foil lined cookie sheet.  Spread an additional 1/2 Cup Ketchup divided between the 6 meatloaf tops.  Return to oven and broil on high for 5 minutes to set the ketchup.

Remove from oven and spread mashed potatoes on top with icing spatula or piping bag.

MASHED POTATOES
Cover Potatoes and whole cloves with salted water and low boil for about 20 minutes.  Test potatoes to see if close to done.  Boil another 10 minutes (Or until potatoes are done to fork test)

Skim off garlic cloves (Save them) and drain the water.  Crush the cooked Garlic cloves with the back of a spoon.  Return cooked potatoes and the cooked crushed garlic to pan, add butter, buttermilk, and salt.  Mash until butter melts, then whip with electric hand mixer until fluffy (You may have to adjust the buttermilk to get light and fluffy potatoes-Add slowly so you do not over do the liquid)

Use piping bag or spoon mashed potatoes on to the individual meatloaves.  Garnish with bacon crumbs and chopped chives.

Serves 6

RECIPE: Scratch Cake Vanilla

 Vanilla Cake (From scratch)

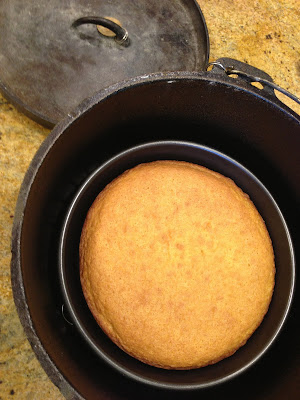
8 inch Layer Cake tin raised up on wire rack inside deep 12 inch Dutch Oven  


Here is a scratch Vanilla Cake recipe.  For use in Dutch Oven Baking recipes or your Kitchen Oven.
Use this in Dutch Oven recipes that require (1 or 2) Box Cake Mix. Or to make a 2 layer cake.


You have the following baking options
Fill round layer pans no more than half full of batter
 *10 inch Dutch Oven if baking in DO direct (7 Coals Bottom -13 Coals Top)  Thick cake or cobblers, cook slightly longer
*12 or 14 inch Dutch Oven if placing 8 inch round cake pan inside DO + trivet or inverted pie pan, if you wish to lift cake pan off bottom of Dutch Oven to avoid over cooking the bottom. Coals for 350°
* (2) Round Cake Pans for Baking in Kitchen oven (Kitchen Oven set to 350°)

 Ingredients
2 Cups      Flour
1 tbsp        Baking Powder
1 tsp          Salt
1/4tsp       Baking Soda
1/2 Cup    Butter Unsalted (If Salted butter is used, reduce salt above to 1/2 tsp)
1 1/4 Cup Sugar (granulated)
3/4 Cup    Milk
1 tsp        Vanilla
2              Eggs

Prep
Preheat Dutch Oven or Oven to 350°

Grease DO or round cake pan with Crisco

Mix Flour, Baking Powder, Salt, and Baking Soda.  Set aside

Beat Butter and Sugar in large bowl on medium to high speed mixer, scraping bowl as you go.  Beat until fluffy.  Beat in Flour mixture, Milk Vanilla, and Eggs, on medium speed until well blended and airy.

Pour into pan and spread even.  Place into preheated Dutch Oven or Oven.  Bake 25-30 minutes or until knife or tooth pick comes out clean.

Cool for 15 minutes, then remove from pans.  Continue to cool completely.

Recipe makes 2 Round Cakes or one Dutch Cobbler type desert.

To layer, and after cooled.  Carefully cut tops of cakes off lightly (don't cut deep just trim tops)  Frost and layer.  Frost with wide frosting blade or serrated bread knife.

RECIPE: Cherry Cobbler in a Dutch Oven

Recipe and photo by: Joelou    Assateague Island State Park - Ocean City, Maryland


Assateague Island Cherry Cobbler,
3 cans cherry pie filling
1 cup of water..
1 box white cake mix
3/4 of a stick of butter


Pour all 3 cans of cherry pie filling in your Dutch Oven.  Use the cup of water to rinse the juice out of all 3 cans and pour in the DO with the filling already there.  Stir the water in gently.  Pour white cake mix or chocolate, but I suggest 1/2 and 1/2 at most.  The chocolate is very sweet. Cut the butter up into 4 or 5 pieces and place around the top of the leveled mix.

Put the lid on with 14 charcoal briquettes on top, 7 on bottom.  Cook 50 min.  Check and then generally bake an additional 30 minutes.  Regardless it's easy and your crowd will love it.
"Everything is safe to eat regardless how cooked"

Thursday, July 25, 2013

COW CAMP COOKERY Don't miss it


Cow Camp Cookery
$20.00 plus $3.50 postage and handling


Dave McDowell has been cooking over a wood fire in Arizona’s back country for over 50 years and has been involved in competitive chuck wagon cooking for the past decade.  The book is not just a collection of recipes it also includes an eclectic bit of history and humor on chuck wagons and camp cooking.

221 pages of information on Cow Camp Cookery
Over 140 Recipes for Dutch oven and camp cooking.
Recipes and tips on cooking for a crowd
Historic Recipes
Vintage Photos
Chuck Wagon History
Historical cooking tidbits
Historical Stories and Narratives

The Cow Camp Cookery Book can be purchased online by sending your email address to biscuitflats@gmail.com 
  In return, you will receive an invoice to pay using the PayPal secure site and the book will be mailed to you. The cost is $20 and postage within the U.S. is $3.50.  For mailing outside of the continental United States please email for the rate - to Australia it is about $14.

You can also mail a check for $23.50 and shipping information to Dave McDowell, 581 N. Ash Dr, Chandler, AZ 85224, and the book will be mailed to you.