Thursday, January 30, 2014

JAMES SMART MANUFACTURING Cast Iron


SMART'S from James Smart Manufacturing.  The following is General information found at various sources that seem to support each other.  At least until more is known.  As with all Cast Iron and foundries we would appreciate any further supporting information, copies of documentation, etc.

It appears the company was first started as a foundry under the name of the Brockville Novelty Works (Ontario, Canada). It was formed in 1854 by James Smart shortly after he emigrated from Scotland. 

Within a relatively short period the company was renamed the James Smart Manufacturing Company.  The company incorporated while taking on new partners.  There is interesting reading regarding this corporate history and hints of hostile takeover.  But we don't want to list that much detail.

Over the next few decades other smaller companies were purchased and combined with the parent company.

In 1912 the Smart Company merged with Canada Foundries & Forgings LTD.  It continued to operate under its original name.  Various on-line searches indicates the foundry under the Smart name closed in 1965, others indicate it was 1967.  It would make sense that the actual foundry work terminated in 1965, and perhaps it took 2 years to dissolve the company and satisfy all the legal matters associated with closing that business?  That might help explain the disparity found in different reference locations?  But again there is no concrete evidence we could find.

Smarts bought Gardiner Tool Company in 1899.  Some Cast Iron marked Smarts also bear a Diamond GSome make the assumption the Diamond G is associated with the fact Smart bought Gardiner Tool, and Gardiner Tool used the Diamond G logo.  But little else is known.  Can we date pieces cast with a Diamond G all being from after 1899?

One of several Diamond G logos used by Gardiner Tool Co
A possible origin of the Diamond G showing up on  Smart's Manufacturing after 1899 ?

Doug Grant commented 9/9/2017     Diamond G' logo is the creation of the GILL family (John M. Gill, president,who purchased controlling shares in the Smart's Foundry company and forced James Smart out of the company. This is well-known in Brockville historical circles.  (We are hoping Doug Grant can expand on this and provide some verifiable documentation we can add here).


The company is probably best known for its cast iron Well, and Cistern Pumps, specializing in Household as well as Industrial Hardware.  They sold their products countrywide as well as establishing a large export market.
 
This company cast iron, and steel, into a variety of goods for sale, Stoves, Pots, Pans, Shovels, Tools, Metal frames for desks, and more.  Their axes in particular were in great demand because of their quality. 

An example of their tool line is the solid-chisel foot powered mortise.  That mortise has surviving vintage pieces that can still be found.  They carry the name of Smart & Shepherd.  


Their cast Christmas tree stands were popular and still sought after.  While Smart's cast iron is perhaps not as collectible in the USA, it is still fairly collectible in Canada. 


Smart cast iron Christmas Tree stand Patent 1931
Notice the Diamond G logo
Smarts #9 Skillet - Image Courtesy of Jeremy Vinek - Saskatoon, Saskatchewan  Canada
We wish to thank Jeremy for sharing the above image with us.  It is so nice to see a piece of cast iron surviving in such great shape.  We love the comment he sent is with his info.  "I believe this pan was used by my Great Grandma, then my Grandma.  After my grandma passed away my mom gave me this frying pan, knowing I wanted one.  I never knew the significance of the history of this pan until now." 

We love these personal stories knowing a piece of cast iron holds an even greater value when passed generation to generation.


Add caption


Photo Courtesy of Erik Soderstrom - Edmonton, Canada


Paul Graham sent along a note with the photos of his #7 skillet.  Quote " I found this at the White Rock British Columbia, Salvation Army Thrift Store.  After some elbow grease and re-seasoning this skillet is to be the "Iron" part of a 6th Anniversary present."  We thought this was a great story as well as a very fine skillet.  Not only should it provide many more years of service, it is a great piece of Canadian history as well.

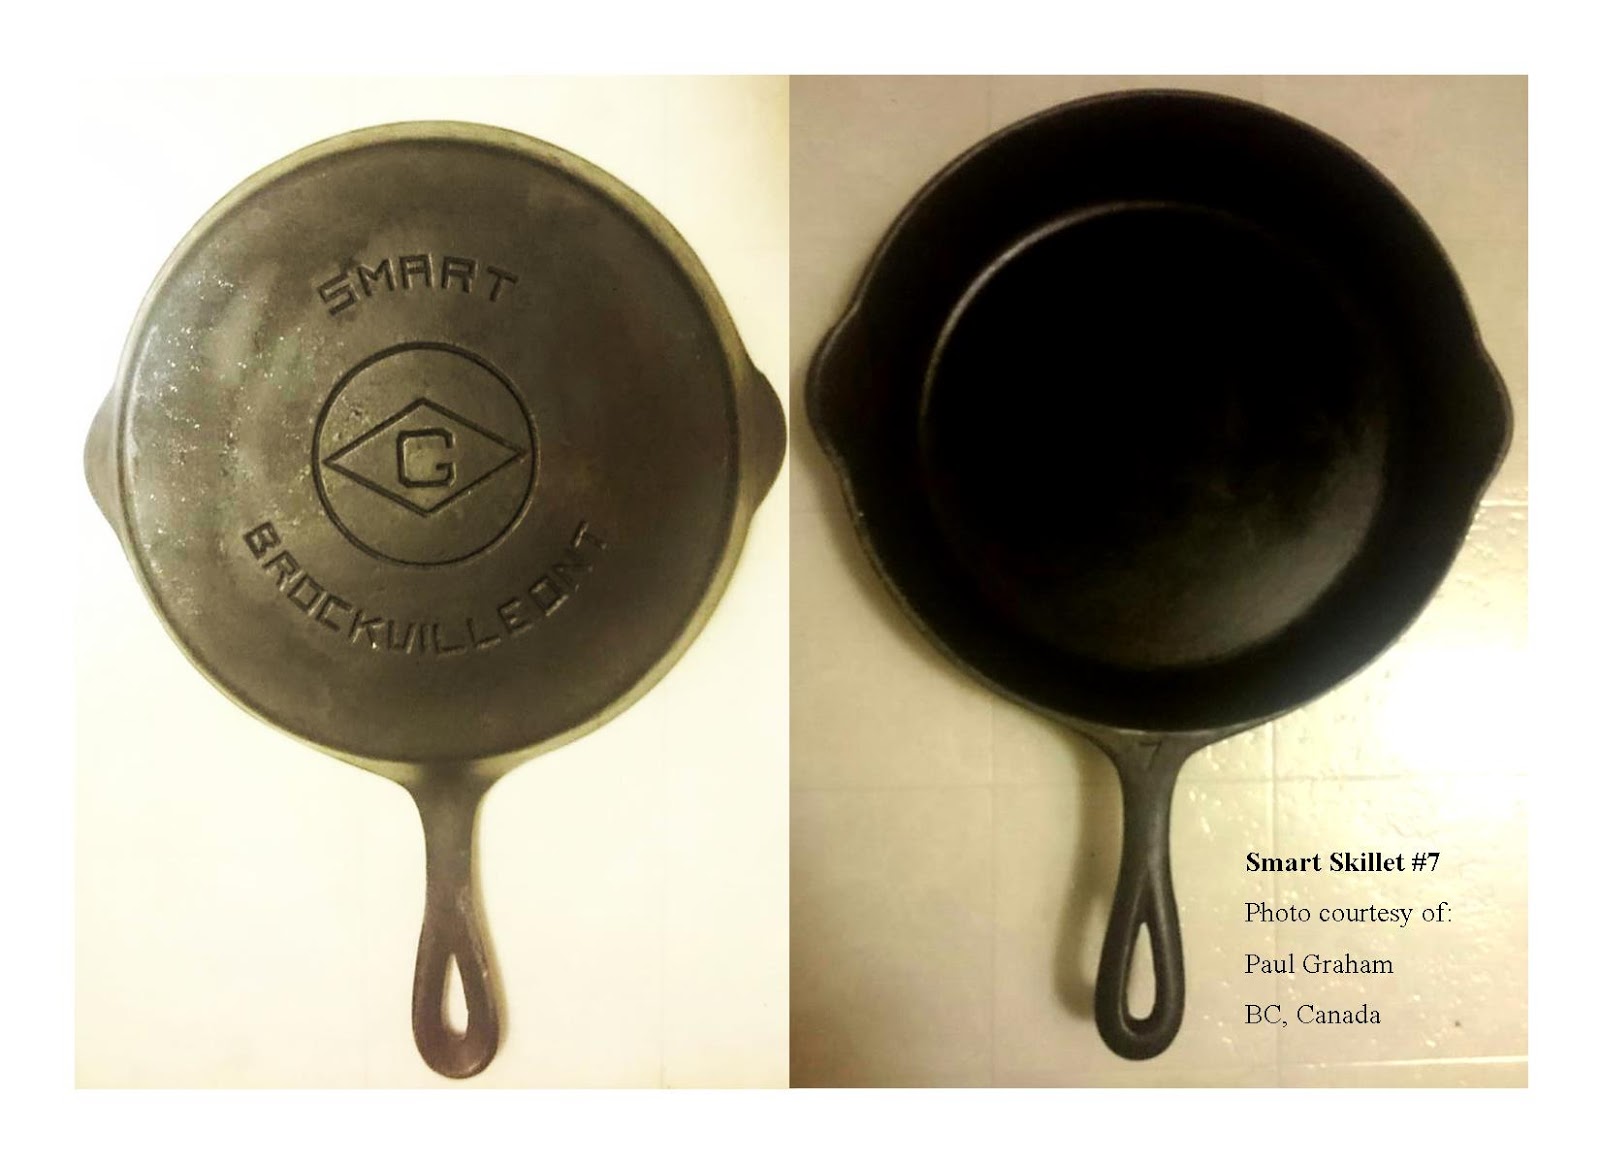
Paul Graham later sent us this photo.  As part of a 6th anniversary present (Iron & Sugar) Paul gifted the Skillet with an Apple pie.  We love this story.  We sent Paul a note to please "gift" the apple pie recipe to us so we can share that with the readers.

Speaking of recipes, follow this link to our master recipe index.  Lots to try out in Cast Iron.  Toponautic's Master Recipe Index


"Smart" Skillet # 7 - Gifted for a 6th Anniversary (Iron & Sugar)
What a great idea for Cast Iron collectors
Photo courtesy of: Paul Graham BC Canada


We would appreciate any additional photos of some confirmed pieces including any types of markings you are willing to share.  Also any additional information on the company that people might find unusual or interesting.


RECIPE: Southern Style Deep Fried Catfish


Southern Style Deep Fried Catfish


Submitted by: Rick Beach


½ Cup Buttermilk
½ Cup Water
¼  tsp Salt
¼ tsp ground Black Pepper
1lb Catfish cut in strips
1 ½ Cups fine Cornmeal
½ Cup Flour
1/2 tsp dried parsley flakes (Cilantro works too)
1 tsp Seafood Seasoning (I use  “Emeril’s All Natural Bayou Blast”)
 
Enough vegetable oil for deep frying

In Bowl mix the buttermilk, water, salt, pepper.  Pour into flat glass baking dish just large enough to hold all catfish strips.  Lay the fish strips in one layer into the buttermilk mixture. Turn to coat all sides.  Cover with plastic wrap and marinate in the fridge for about an hour.

In an old bread loaf bag or equivalent size combine the cornmeal, flour, seafood seasoning and parsley flakes.  Add catfish pieces a couple at a time.  Rotate bag several times to coat the fish pieces. 

Heat oil to 365°F

Deep fry the coated catfish pieces until golden brown.  Fish should be slightly crispy on the outside.  Drain on paper towels to remove excess oil.

Are you interested in making your own buttermilk?  Or don't have any on hand or time to wait?   Don't give up, you can make a quick buttermilk substitute. 

Monday, January 27, 2014

ONAN REMOTE SWITCH WIRING 028-00022


For uses with the KY series Microquiet 4KW Generators (Perhaps others as well)
Remote Switch (Prime-Start-Stop) and digital hour meter # 028-00022
25 foot Wiring Harness # 044-00026 (Spade tip terminals for panel end-Onan connector at Generator end)

We found this harness included the factory wired plug, as shown in the image, on one end.  The other end of the harness has factory connected to individual "female spade terminals" on the other end of each of the colored wires.  The "spade terminals" are pushed on to the back of the panel, on to the male protruding metal tabs using the wiring diagram shown.  We then plugged the multi-pin connector to the Generator factory wired remote plug.  We test started and stopped the generator with the new switch before proceeding.

3/4 inch PVC Conduit was run from the Generator to the interior of our RV/Trailer to the point we would mount the panel.  We pulled the wire through the conduit and made the connections at both ends.  Mounted the panel and we were then complete with the project.

The conduit installation was the most difficult and time consuming part of this installation.  Hooking up the harness to the panel and generator was a simple task in our configuration.


Have you dealt with an "ICE HOLE" lately ?

 We made our annual trek to Ely, Nevada, location at Cave Lake State Park to be more specific.  For years we have been attending the annual Rotary Fishing Derby to have some great winter fun.  Its a 250 mile trip one way for us.

While there is a chance to win a tagged fish and a chance at the Grand Prize of $5000, many flock to the event to just enjoy a day on the ice.  Most years the sky is blue and daytime temps in the thirties and forties.  Of course night time temps dip to below zero.  This year the ice was easily 14 inches thick.

The Rotary Ice Fishing Derby does it up right.  For more info on the Derby click the following link:  Ely Website with more info  You need to fill out an entry form and send in your entrance fee.  Make sure the new entry form is loaded on their site for download.  Don't end up with the previous years and perhaps showing the wrong date.  

The event actually starts the evening before in town, during the beat the rush registration process.  This is downtown at the Bristlecone Convention Center.  150 6th St.  Ely, Nevada.  Everyone that has entry forms check in.  Or you can register there at a higher fee.  All entered get 2 free adult beverages and all sorts of free finger food.  Purchase raffle tickets for great prizes later in the evening.  Many mingle and talk fishing.  It seems to be a universal language.  Men, women, children, and most years we have seen the physically challenged in wheelchairs.  If you have the fishing bug I guess nothing keeps you off the ice?

The next day on the ice you will see commercially purchased ice sleds.  Others have homemade elaborate sleds.  “We aren’t just fishing out here” some have been quoted.  It’s the equivalent to any tailgate party, at any major sporting event.  A small city materializes on the ice.  Gas camp stoves, BBQ's, Dutch Oven cooking, Tents, heaters, and yes....I have even seen someone out there with the TV watching a game somehow.  Maybe it was a DVD?

Grilled burgers and drinks are available to purchase if you want to go "light".

We thought we would get ahead of the crowd this year.  We knew finding close parking at the late is at a premium.  We left our motel room, and drove up to the lake in the dark arriving at 6AM.   We were amazed to find all the good parking spots gone, and the ice already being covered with fishermen.  People were staking their claims to their section of ice.  Gas Lanterns casting light across the cold ice, tents going up, ice holes being drilled, fires started and a number of other activates.  It was about 6 degrees at this point of the morning.  Brr!

Fishing is not allowed until 8am, when it is announced by a cannon blast from up on the hill by the ranger station.  So everyone was scurrying around getting ready, then relaxing until the start of the derby.  Camp stoves were heating up coffee and breakfast.  With no wind this day, you could catch the smell of coffee and hot food drifting by.


Those with all the creature comforts amaze me.  Tents, floors to insulate from the cold, gas heaters, cook stoves, BBQ grills, lanterns, comfortable chairs, and way much more.  It’s not uncommon to see someone with a fish finder and its probe hanging down into the ice hole.  This is serious stuff!  Serious fun too!

You could feel the concussion of the cannon blast in your chest, clear across the lake.  The suddenness of it makes you jump.  With the huge cloud of billowing smoke from the cannon the 2014 Derby was off to its start.

Throughout the day a cannon blast would announce someone had just checked in another tagged fish.  If that was your fish I can only image the excitement.  For us out on the ice it meant one less tagged fish was swimming around under the ice.  Our chance of paying for the trip dwindling!

Regardless of the tagged fish it was fun to be out on the ice, out on a beautiful small lake, up in the mountains.  It was time to pour a steaming cup of coffee, set back in the chair, and look at the beautiful hills surrounding us.  The crisp air and the sun warming your face.  Easy to drift off on a nap… Oops…..got to go.  Something is jerking my line....got a bite! 


Sunday, January 19, 2014

RECIPE: BUTTERMILK and a substitute for use in a pinch.


Homemade Buttermilk

Did you know?  

Buttermilk of “Yester-Year” was originally a left over by-product.  The liquid left after skimming or separating out the butter cream from raw whole milk.  The remaining watery fluid water was allowed to ferment naturally forming a thin, sweet yet tart, “Buttermilk”. 

Today traditional Buttermilk is prepared by adding living bacteria cultures to pasteurized fat free or low-fat milk.  This gives buttermilk its rich and creamy texture, and today is labeled "Cultured" Buttermilk.

The fat content of Buttermilk is just the opposite of what its name implies.  One cup of Buttermilk contains 2.2 grams of fat, and about 100 calories. Compared to regular milk, that contains 8.9 grams of fat and 157 calories.

The “good” bacteria in Buttermilk is similar to those that produce yogurt.  True Buttermilk (Not pasteurized) is one of the pro-biotic foods that contain living microorganisms.  The friendly bacteria that protects the body from many diseases by improving the general immunity of the body.

The last time I checked several stores including health food stores, I could not find true Buttermilk prepared the traditional way.  Those containing those living powerful probiotic microbes sometimes referred to as "Grandma's Probiotic".  In some states, laws surrounding Pasteurization may prevail.  This could be nation wide at this point? 
Pasteurization of milk products heats the product to kill off all bacteria. 

Commercially available buttermilk has been pasteurized and homogenized.  To produce commercial Buttermilk the processed milk is then inoculated with a culture of Lactococcus Lactic and other additives to simulate the nature ingredients in the "Old Fashioned" real stuff.  Some commercial dairies even add colored flecks to simulate pieces of butter that real Buttermilk used to contain.

The acidity and sweetness of traditional buttermilk has been used in recipes for years.  Buttermilk is commonly used in breads and biscuits to name just a few.   

Using Buttermilk along with baking soda provides an effective leavening agent.  It’s the magic ingredient that produces those old fashioned light and fluffy biscuits, breads, and pancakes or flap jacks.  Many old recipes you might find your grandmother or mother had, would call for Buttermilk.  Now you know it was partially a way to use up a by-product and not waste it.  And oddly today we are finding out it was much more healthy too.  


  ------------------------------

Do you want to make your own real stuff?  Create your own pro-biotics?  Kind of like sourdough starter mix in which you keep a perpetual batch going.  Follow this simple method.  I am not sure this is truly as beneficial as the old fashioned real, un-pasteurized buttermilk of years ago.  But this is fun to make.  It is great to keep a batch on hand in the fridge for baking.

To make a quart of real buttermilk:

6 to 8 ounces of Store bought Cultured "Active" Buttermilk.  Make sure it is labeled “Live” or “Active Cultures”  We will provide the method below combining "active" Buttermilk.  As well as the method of combining "active" Sour Cream to pasteurized milk.
You may have to find this in a health food store.  Pasteurized products normally are dead (Bacteria killed off). Make sure the sour cream container does not say pasteurized.  Or it is marked "Live" or "Active Cultures". 

It will still make a starter as long as it says "Live" or "Active Cultures".  If it was pasteurized, then you can be sure it has the additive type bacteria discussed above.

Other methods would be to obtain whole milk from a local farmer.  Let it sour. (we are not covering that process)


Additionally freeze dried cultures are available via the internet for purchase.  But these freeze dried cultures are not the real deal either.  They are most likely the type added commercially to pasteurized milk.  (we are not covering that process either)

------------------------------

3 Cups of Milk (Skim, 2% or Whole) + 6-8 ounces of "Active" Butter Milk (Multiply as needed)

In a clean quart jar mix the 3 cups of milk and 6-8 ounces of "Active" Buttermilk
Cap the jar and shake to mix
Let stand at room temperature for 24 hours with the lid on
Taste test.  It should be tart and cling to the sides of the glass jar.  Refrigerate at this point.  Bring to room temperature to add to recipes.
      If not tart or thickened leave it at room temperature for another 12 hours (36 hrs total)
      If it is still not tart you may not have used “active culture” buttermilk or your culture died off.
Save back 8 ounces of a good batch to start your next batch with 3 new cups of regular milk for your next recipes.

------------------------------

Note:  I could not find buttermilk marked "Live" even at our area health food stores.  I did find Sour Cream that said it contained "Live and Active Cultures".  Since you can make Sour Cream using this method I assumed Sour Cream would be backward compatible to be used as a starter.  So below is yet another recipe.  My first batch stood for 36 hrs.  At 24 hrs it was too thin.  At 36 it was rather thick nearly yogurt consistency.  So next time I will check a little sooner.  But it was great tasting!

1/2 Cup Sour Cream marked it contains "Live and Active Cultures"
                "Horizon brand Organic - pasteurized but marked contains "Live and Active Cultures" 
1/2 Gal  Milk (Regular, 2%, or skim) 

In a clean 2 quart glass container mix the 3 cups of milk and 6-8 ounces of buttermilk
Cap and shake to mix
Let stand at room temperature for 24 hours with the lid on (I seal mine with plastic wrap and a rubber band.

Taste test.  It should be tart and cling to the sides of the glass jar.  Refrigerate at this point.  Bring to room temperature to add to recipes.
      If not tart or thickened leave it at room temperature for another 12 hours (36 hrs total)
      If it is still not tart you may not have used “active culture” buttermilk or your culture died off.

Save back 8 ounces of a good batch of Buttermilk to start your next batch with 3 new cups of regular milk.

------------------------------

Bonus Recipe.  To make Sour Cream, start with whole cream instead of milk.  Follow the same process for making real buttermilk, using your preferred starter.

------------------------------

Our first test batch was used to make some homemade Buttermilk biscuits....Oh yeh!  They turned out light and fluffy.  Yum!

Our Old Fashion Buttermilk Biscuit recipe


If you are baking and find you don’t have Buttermilk in your fridge, don’t despair.  You can still get the taste by cheating a little and creating your own batch that will work in a pinch.  You just won’t get all the benefits of the Probiotics of real Buttermilk. 

To make one cup of substitute Buttermilk for use in recipes:
1 Tbsp  White Vinegar or Fresh Lemon Juice
1 Cup Milk (2% or nonfat)

Place the vinegar in a glass measuring cup.  Then add enough milk to the vinegar to equal 1 cup of total liquid.  Stir and let stand for 10 to 15 minutes until the mixture curdles.  The acid in the Vinegar or lemon juice does its work.

Make a large enough batch to use in recipes calling for buttermilk quantities.  Cover and refrigerate any unused portion.